Skip to content
Parallax Learn (Stage)

Parallax Learn (Stage)

This is the staging site. Please see https://learn.parallax.com for the official site.

  • Welcome
  • Tutorials
        • Tutorial Series head tag

          Tutorial Series
        • Tutorial Series

          The special, classroom-ready series pages are organized collections of tutorials for our most popular hardware and/or languages. The tutorials for each topic are conveniently accessible from a single page, shown in the order it is recommended that they be completed.
        • Robotics Series Head tag

          Robotics Series
        • Robotics Series

          • Artificial Intelligence Tutorial Series
          • Cybersecurity: Radio Data tutorialCybersecurity Tutorial Series
          • cyber:bot Tutorial Series
          • Boe-Bot Tutorial SeriesBoe-Bot Tutorial Series
          • Arduino Shield-Bot Tutorial Series
          • ActivityBot with C TutorialsActivityBot with C Tutorials
          • ActivityBot with BlocklyProp Tutorial SeriesActivityBot with BlocklyProp Tutorial Series
          • Scribbler 3 Tutorial SeriesScribbler 3 Tutorial Series
        • Electronics & Programming Series Head tag

          Electronics & Programming Series
          • BS2 Board of Education Tutorial SeriesBS2 Board of Education Tutorial Series
          • Propeller C-Language BasicsPropeller C Basics and Projects
          • FLiP Try-It Kit C Tutorial SeriesFLiP Try-It Kit C Tutorial Series
          • FLiP Try-It Kit BlocklyProp TutorialsFLiP Try-It Kit BlocklyProp Tutorials
          • Badge WX Tutorial SeriesBadge WX Tutorial Series
          • Propeller BlocklyProp Basics and ProjectsPropeller BlocklyProp Basics and Projects
          • View All Tutorial Series »
        • Browse Tutorials
        • Browse Tutorials

          Individual tutorials sorted by robot or kit, and language.
        • By Robot or Kit
          • ActivityBot
          • SumoBot WX
          • Boe-Bot
          • Shield-Bot
          • cyber:bot
          • Badge WX
          • ELEV-8
          • ARLO
        • By Language
        • By Language

          • Propeller C
          • Arduino
          • BlocklyProp
          • PBASIC
          • Python
          • View All Tutorials »
  • Educators
  • Reference
  • Downloads
  • Home
  • All Courses
  • Propeller C – Start Simple

Propeller C – Start Simple

Array Variables

Array Variables.c

A variable array is a group of variables under the same name but with a different index value for each element in the array.  Here is an example of an array declaration and initialization:

  int p[] = {1, 2, 3, 5, 7, 11};

Each array element has a name (which is p in this example, the same as the array name) and an index (between brackets) that makes it possible to select an element.  This declaration sets aside six variables, each storing a prime number.  This array has been initialized so that the p[0] array element stores 1.  Likewise, the p[1] element stores 2.  It continues for the rest of the array elements:  p[2] stores 3, p[3] stores 5, p[4] stores 7, and p[5] stores 11.

  • Use the Open Project button to Open Array Variables.side.
  • Examine the code and try to predict what the SimpleIDE Terminal will display.
  • Use the Run Project with Terminal button to display the programs outputs, and compare the actual results to your predicted results.
/*
 Array Variables.c
 Declare and initialize an array and display a couple of its slements.
*/

#include <stdio.h>                            // Include standard I/O header
#include "stamp.h"                            // Include stamp functions

main()                                        // Main function
{
  int p[] = {1, 2, 3, 5, 7, 11};              // Initialize the array
  pause(1000);                                // Wait 1 s for host
  printf("p[0] = %d\n", p[0]);                // Display what p[0] stores
  printf("p[3] = %d\n", p[3]);                // display what p[3] stores
}

How the Code Example Works

int p[] = {1, 2, 3, 5, 7, 11} initializes an array named p that stores prime numbers.  Keep in mind that p[0] stores 1, p[1] stores 2, p[2] stores 3, p[3] stores 5, and so on.  So, printf(“p[0] = %d\n”, p[0]) displays the contents of p[0], which is 1.  Likewise, printf(“p[3] = %d\n”, p[3]) displays the contents of p[3], which is 5.


Did You Know?

  • You can declare an array with six elements, but without initializing the values,  like this: int p[6];
  • You can assign the array elements later, like p[4] = 7;

Try this

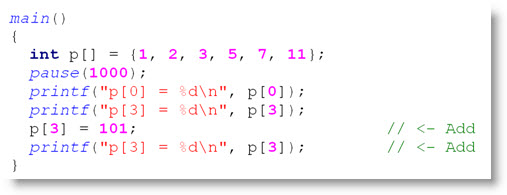
Here is an example that shows how the value of an array element can be reassigned.  Take a look at the second to last statement in the main function.  It’s p[3] = 101.  After that, printf(“p[3] = %d\n”, p[3]) will allow you to verify that the new value p[3] stores is 101.

  • Click the Save Project As button and save your project as Array Variable Reassignment. 
  • Modify the program using the example below.  (Just add the last two lines.)
  • Click the Run Project with Terminal button, and verify that the program starts with the value of [3] being 5, and that it reassigns it to 101.

Your Turn 

  • Expand Array Variable Reassignment.c by adding commands to the end of the program that puts 11 in p[0], 7 in p[1], 5 in p[2], 3 in p[3], 2 in p[4], and 1 in p[5].
  • Expand your program further so that it displays the values after they have been updated.

Printer-friendly version
Simple Hello Message
Prev
Counting Loops
Next

DISCUSSION FORUMS | PARALLAX INC. STORE

About | Terms of Use | Feedback: learn@parallax.com | Copyright©Parallax Inc. 2024

© 2025 Parallax Learn (Stage) • Built with GeneratePress