In the Python language, you can use specialized instructions just for the micro:bit that are grouped into modules. A module must be stored in a special area on your micro:bit, called the file system, before its instructions can be used in a script. For example, the cyberbot library archive includes several modules that will let you write micro:bit scripts for your cyber:bot robot. You can read about them in the cyber:bot library reference here.
You have two options: use a .hex file template that already has the module included, or add the module to your micro:bit file system manually.
- How to use a .hex file template that already has the module included: Quick Start Template for cyber:bot Robots using Online Python Editor (below)
- How to add the module to your micro:bit file system manually: Adding a Module to micro:bit Filesystem (also below)
Quick Start Template for cyber:bot Robots Using Online Python editor
Here is a template shortcut if you are using the online python.microbit.org editor and just need to get started with the cyber:bot robot quickly. Simply download the template below, open it with the Python online editor, and start coding. It already has the cyberbot module added to its project settings, so you can use its instructions in your scripts right away.
- Right-click the hex link below, choose Save link as…, and then save the file to your computer.
Cyberbot-template-with-blink.hex
As written, this script will make the P21 light blink. Let’s try this to make sure the cyber:bot system is ready:
- In either Google Chrome or Microsoft Edge, go to the micro:bit Python Editor at https://python.microbit.org/v/3
- Click the micro:bit Python Editor’s Open button.
- Browse to and open cyberbot-template-with-blink.hex (it’s usually in the Downloads folder).
- Make sure that:
- The micro:bit is connected to the cyber:bot board.
- The 5AA battery pack is plugged into the cyber:bot board.
- The micro:bit is connected to a computer with the USB cable.
- The cyber:bot board’s PWR switch to 2 to power all features, or to 1 to power everything but the servo ports (this keeps the robot from running away while downloading code). The script won’t run if PWR is set to 0.
- Click the Send to micro:bit button, and follow the Connect to micro:bit popups. (For robot navigation apps, you’d be disconnecting the USB cable after this step.)
- Verify that the P21 light blinks.
The cyberbot-template-with-blink.hex file is a good one to open every time you start on a new cyber:bot project. Just delete the default script and replace it with whatever cyber:bot script you are working on. Make sure to update the script name before you save your work. (See Save & Edit Scripts.) When you reopen the file later with the micro:bit Python Editor, it will still have the module(s) it needs and be ready for the cyber:bot to run. That way, you won’t have to repeat all the steps in the Adding a Module to the micro:bit Filesystem section every time.
Adding a Module to micro:bit Filesystem
Follow these instructions for adding a module to your micro:bit. The cyberbot.py module is used as an example. The step-by-step video and checklist instructions will guide you through creating and saving a project file that has the cyberbot module. When you start writing scripts that make the cyber:bot robot move, yoy will be able to open the file you saved, and it will have the cyberbot module ready to use.
- Follow along with your own computer and micro:bit module.
]
- Go to www.parallax.com/package/cyberbot-library-python/.
- Click the Download button.
- Use a file browser (Windows Files Explorer, Mac Finder, or Chromebook Files app) to look in the Downloads folder and find the cyberbot-micropython-v0-9-2.zip archive.
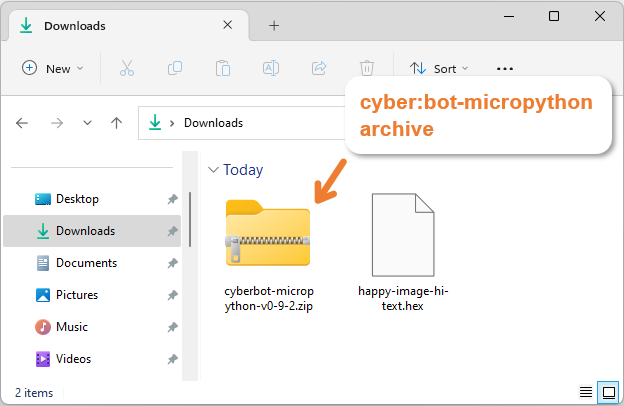
- Unzip/extract the archive:
- Windows File Explorer: Right-click cyberbot-micropython-v0-9-2.zip, select Extract all, and then follow the prompts
- Mac Finder: If double-clicking it doesn’t automatically extract the files to a folder, then Right-click (or two finger tap or CTRL + Click) cyberbot-micropython-v0-9-2.zip, point at Open With, and select Archive Utility.
- Chromebook: Right-click cyberbot-micropython-v0-9-2.zip, select Extract all.
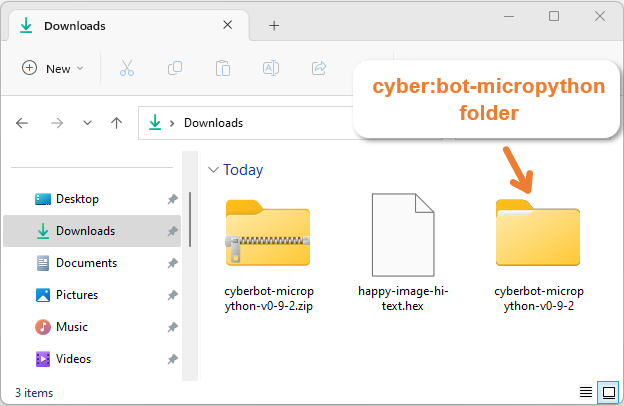
- Verify that you can now see a cyberbot-micropython-v0-9-2 folder (in addition to the .zip file with the same name) in your Downloads folder.
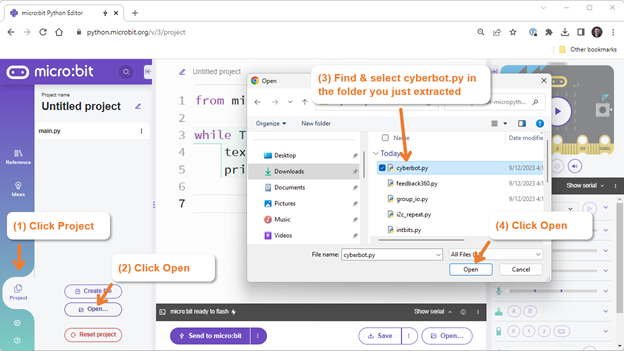
- Back in the micro:bit Python Editor, click the Project tab. It’s along the left side panel near the bottom.
- Click the Open… button near the bottom of the left side panel (not the one in the bottom-right).
- In the Open dialog, browse into the downloads / cyberbot-micropython-v0-9-2 folder. Make sure you are browsing into the folder and not into the .zip file archive.
- Find and select cyberbot.py and click the Open button.
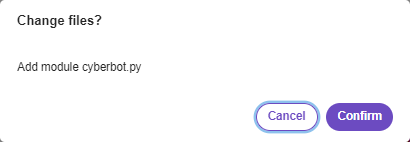
- In the Change files? popup, make sure it says Add module cyberbot.py, and then click the Confirm button.
- Check to make sure that both main.py and cyberbot.py are listed in the left side panel’s Project tab.
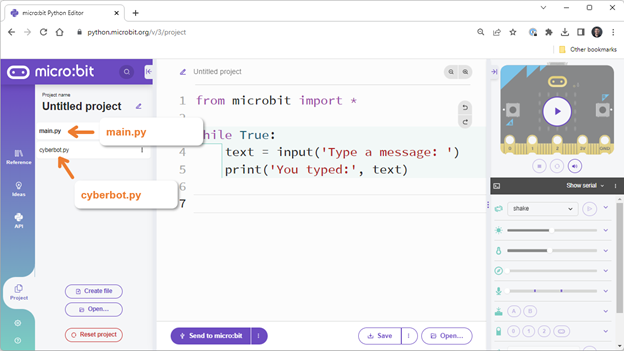
Note: You will learn how to use this module later. For now, just note that you can also find cyberbot module documentation at: learn-ebiz-stage.parallax.com/support/reference/cyberbot-library-reference.
- Click main.py and replace whatever’s in the editor pane with this:
# Template for cyber:bot Robot
from cyberbot import *
- Rename the project to cyberbot template. For a refresher on how to rename a project, see the Save & Edit Scripts with micro:bit Python Editor V3 section.
- Click the Save button to download a copy of cyberbot template.hex to your Downloads folder.
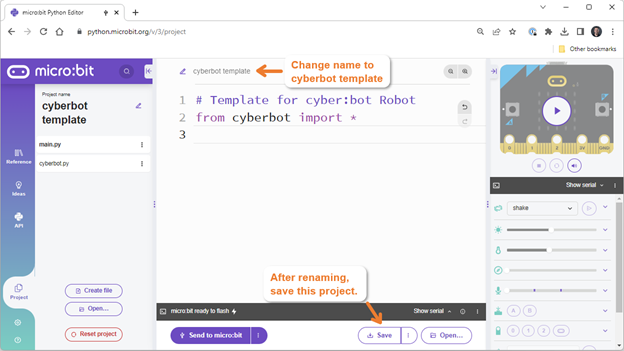
IMPORTANT: The script in these steps will only work when the micro:bit is connected to a cyber:bot board that has battery power and its power switch set to 1 or 2. So, for micro:bit-only projects, it’s best to go back to a project that does not contain the cyberbot.py module
- Close the micro:bit Python Editor tab in Chrome. Then, open a new tab and go back to https://python.microbit.org/v/3 again.
- Click the left side panel’s Project tab again, and verify that there is no cyberbot.py module listed. Now, you are ready to write more micro:bit-only scripts.
