Skip to content
Parallax Learn (Stage)

Parallax Learn (Stage)

This is the staging site. Please see https://learn.parallax.com for the official site.

  • Welcome
  • Tutorials
        • Tutorial Series head tag

          Tutorial Series
        • Tutorial Series

          The special, classroom-ready series pages are organized collections of tutorials for our most popular hardware and/or languages. The tutorials for each topic are conveniently accessible from a single page, shown in the order it is recommended that they be completed.
        • Robotics Series Head tag

          Robotics Series
        • Robotics Series

          • Artificial Intelligence Tutorial Series
          • Cybersecurity: Radio Data tutorialCybersecurity Tutorial Series
          • cyber:bot Tutorial Series
          • Boe-Bot Tutorial SeriesBoe-Bot Tutorial Series
          • Arduino Shield-Bot Tutorial Series
          • ActivityBot with C TutorialsActivityBot with C Tutorials
          • ActivityBot with BlocklyProp Tutorial SeriesActivityBot with BlocklyProp Tutorial Series
          • Scribbler 3 Tutorial SeriesScribbler 3 Tutorial Series
        • Electronics & Programming Series Head tag

          Electronics & Programming Series
          • BS2 Board of Education Tutorial SeriesBS2 Board of Education Tutorial Series
          • Propeller C-Language BasicsPropeller C Basics and Projects
          • FLiP Try-It Kit C Tutorial SeriesFLiP Try-It Kit C Tutorial Series
          • FLiP Try-It Kit BlocklyProp TutorialsFLiP Try-It Kit BlocklyProp Tutorials
          • Badge WX Tutorial SeriesBadge WX Tutorial Series
          • Propeller BlocklyProp Basics and ProjectsPropeller BlocklyProp Basics and Projects
          • View All Tutorial Series »
        • Browse Tutorials
        • Browse Tutorials

          Individual tutorials sorted by robot or kit, and language.
        • By Robot or Kit
          • ActivityBot
          • SumoBot WX
          • Boe-Bot
          • Shield-Bot
          • cyber:bot
          • Badge WX
          • ELEV-8
          • ARLO
        • By Language
        • By Language

          • Propeller C
          • Arduino
          • BlocklyProp
          • PBASIC
          • Python
          • View All Tutorials »
  • Educators
  • Reference
  • Downloads
  • Home
  • All Courses
  • Convert to a cyber:bot (Rev A or B board)

Convert to a cyber:bot (Rev A or B board)

Prepare the Chassis

Preparing the chassis involves 3 steps:

  1. Removing the current development board
  2. Only if you want to, you can change the servo orientation now
  3. Upgrading to a 5-AA battery pack if necessary


Remove the Current Board

  • Unplug the servos and battery plug from your robot’s current development board.
  • Remove the development board from the robot’s standoffs. Save the #4-40 pan-head screws and whisker-post hardware!

Check the Servo Orientation

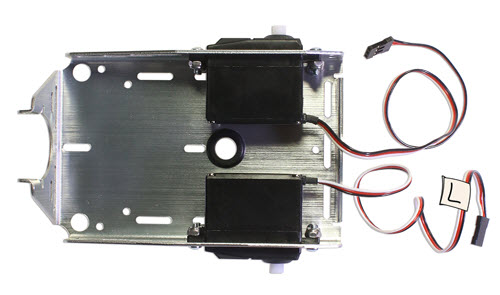
The cyber:bot robot uses the same Continuous Rotation Servos as the Boe-Bot and Shield-Bot.  You do not need to change the position of the servos!

The Boe-Bot and Shield-Bot instructions install the servos with the servo mounts inside the chassis, and with the servo cables pointing back towards the tail wheel. This is perfectly fine! You can keep them this way!

However, some images in this tutorial may show the servo mounts outside of the chassis, as shown below. This makes it easier to swap out servos if needed.

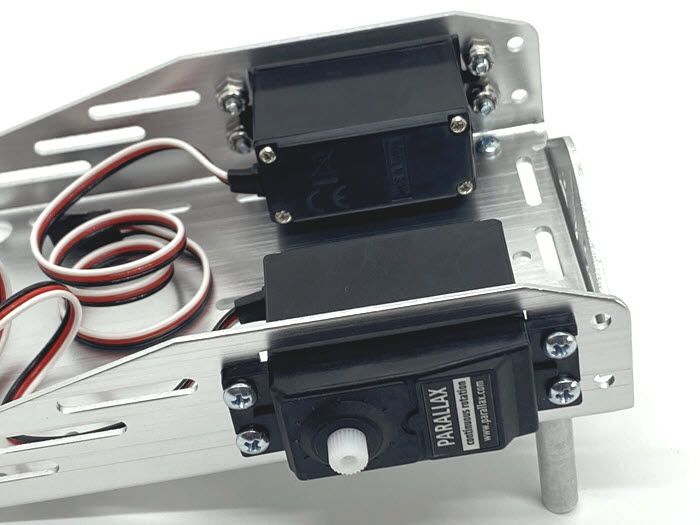
Other images may show the robot with the servo cables pointing towards the front of the robot. This makes it easy to re-center servos that have a potentiometer adjustment screw. However, this configuration’ wider wheel base makes it harder for the robot to make turns. If your robot servos are ports-backward, you can still adjust the poteniometers using a long, thin screwdriver, if needed.

  •   If you want to re-install the servos to a different configuration, do that now.


Upgrade the Battery Pack if Needed

The cyber:bot uses a 5-AA battery pack. If your robot has a 4-AA battery pack, follow the steps below to replace it.

  • Remove the 4-AA battery pack and save the Nylon flat-head screws (if you have not done so already).
  • Remove the screws holding the rear standoffs to the chassis.
  • Insert the 5-AA battery pack. It takes a bit of maneuvering: slide the edge under the the tail wheel ball, level it out, then snap it into place.
  • Insert the reserved Nylon flat-head screws, threading them through the battery pack case’s outermost holes.

  • From the top of the chassis, thread a 1″ round standoff on each screw and tighten.
  • Pull the battery pack’s power cord and servo lines through the rubber grommet hole in the center of the chassis. 

Printer-friendly version
Connect your micro:bit
Prev
Clone of Attach the new board
Next

DISCUSSION FORUMS | PARALLAX INC. STORE

About | Terms of Use | Feedback: learn@parallax.com | Copyright©Parallax Inc. 2024

© 2025 Parallax Learn (Stage) • Built with GeneratePress