PIR Motion Sensor
A PIR Sensor can tell when something nearby moves. The sensor detects the pattern of infrared energy in its surroundings. If the pattern changes, the sensor outputs a high signal. The Propeller microcontroller only needs to monitor this signal with an I/O pin to know if something is moving around nearby.
Circuit
Parts
(1) PIR Sensor Rev B (#555-28027)
(1) 220 ohm resistor
(3) jumper wires
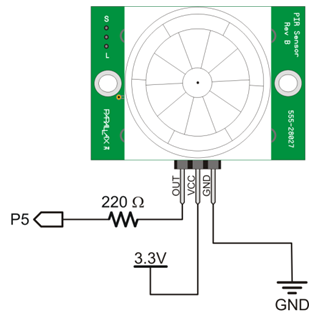
The PIR sensor connects to 3.3 V, ground and a single Propeller microcontroller I/O pin. (The 220 ohm resistor isn’t strictly necessary, but it could help protect the sensor from an accidental signal sent from the Propeller I/O pin, which could happen from wiring or coding errors.)
- Turn off power to your board’s prototyping area (PWR switch to 0 for the Activity Board (original or WX version)).
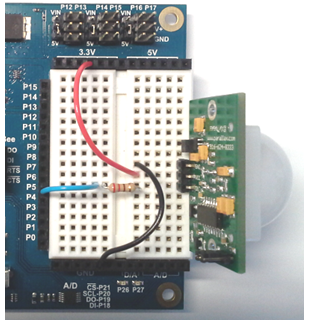
- Connect your PIR Rev B to your Activity Board (original or WX version) as shown below.


Note: The circuit and example code in this tutorial also work with the PIR Mini (#28033). Connect its Out pin to P5, its VDD pin to 3.3 V, and its GND pin to ground.
Test Code
The following program continuously checks and prints the output state of the PIR sensor.
If you haven’t already installed the latest USB driver, SimpleIDE, or Learn folder, go to Propeller C – Set up SimpleIDE.
- Position your board so the white dome on the PIR sensor is mostly pointing away from you, but you can still see it a little bit.
- Turn on power to your board’s prototyping area again (PWR switch to 1 or 2 for the Activity Board (original or WX version)).
- Click SimpleIDE’s New Project button.
- Save the project as PIR Rev B.side.
- Copy and paste the program below into SimpleIDE.
/*
  PIR Rev B.c
*/

#include "simpletools.h"                      // Include simpletools library

int main()                                    // Main function
{
  while(1)                                    // Main loop
  {
    int state = input(5);                     // Check sensor (1) motion, (0) no motion
    print("%c state = %d%c\n",                // Display sensor
           HOME, state, CLREOL);
    pause(200);                               // Pause 1/5 second before repeat
  }
}
- Click the Run with Terminal button.
- Hold still until you see “state = 0” in the SimpleIDE Terminal.
- Now, wave your hand in front of the sensor’s dome. You should then see “state = 1” in the SimpleIDE Terminal.

How it Works
First, this program includes the simpletools library for its print, pause, and input functions.
The code is entirely inside an infinite while(1) loop. The statement int state = input(5); means “check I/O pin P5 (which is connected to the PIR sensor) and store the result in the local int variable named state.”
If the I/O pin detects 3.3 V, the PIR sensor detected motion and a 1 is stored in state. If the I/O pin detects 0 V, no motion was detected and a 0 is stored in state.
Next, a print statement displays the value of state in the SimpleIDE Terminal. The %c formatter in the string is needed for the HOME and CLREOL control characters. HOME returns the cursor to the upper left position before printing the text and value of state. CLREOL means “clear to end of line” which erases any other characters that may be on the same line in the terminal. Together, these let the display use just one line and update cleanly.
Finally, pause(200) slows down the loop a little bit.
Did You Know?
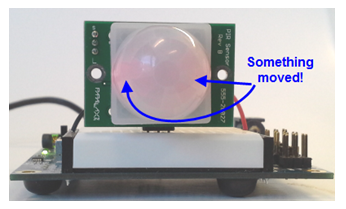
What’s that glow? — A faint red glow from two LEDS inside the PIR Sensor Rev B’s white dome indicates that the sensor is triggered. It is typical for the sensor to be triggered when it is first powered up and getting an infrared reading from its environment. Once triggered by start-up, or by a moving object, the sensor stays in that state and sends a high signal for several seconds.

Passive Infra-Red — That’s what PIR stands for. The sensor is passively relying on infrared light/heat naturally emitted from surrounding objects. It is not actively sending out infrared signals and looking for a reflection, as some other types of infrared object sensors and line followers do.
Automatic Lights and Alarm Systems — If you have an night light that comes on automatically when you walk near it, there’s likely a PIR sensor inside. Also, PIR motion sensors are sometimes used alone or with other types of sensors in security systems to detect intruders.
Try This
You may noticed that if you make just a quick movement, the sensor stays in its triggered state for several seconds even if everything is still again. The example code above checked the sensor’s output about every 200 ms. That is more frequent than needed once the sensor is triggered, and maybe not frequent enough if you want your system to respond immediately to a detected motion. Also, it might be helpful to see how many times the sensor has been triggered. The changes below take care of all these issues.
- Click Save Project As, rename your project, and save it to the My Projects folder.
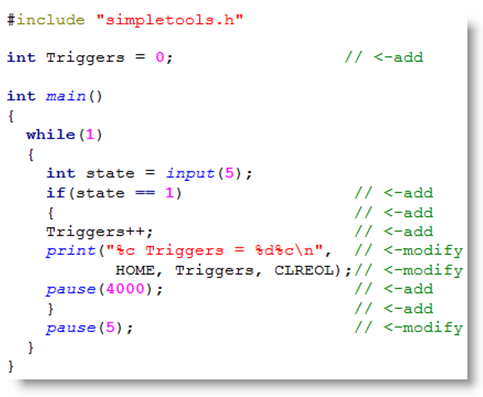
- Add a global variable named Triggers, and initialize it to zero.
- Replace the print statement with the if.. statement and code block as shown below.

- Now, trigger the sensor with a quick movement, and then hold still. You should see the message “Triggers = 1” appear in the SimpleIDE Terminal.
- Repeat the quick motions every few seconds, and the value of Triggers should increase each time.

Now, the outer while(1) loop repeats faster, since pause(200) was reduced to pause(5). But, if the sensor is triggered, a pause(4000) in the if… statement keeps the message from printing repeatedly while waiting for the sensor to clear from its high state. You can adjust this pause time if your sensor is still printing more than once from a quick motion.
Your Turn – Project Idea
Make your Activity Board (original or WX version) an audible motion alarm disconnected from your computer. Here are some suggested hardware and software changes:
- Add a piezospeaker circuit to your board (see the Piezo Beep lesson).
- Or, get fancy by putting WAV files on a microSD card to play on a speaker plugged into the audio jack. (See SD Card Data and Play WAV Files.)
- Add a pause above the while(1) loop to allow you to position and turn on your motion alarm and then clear out without triggering it yourself.
- Add code inside the if…code block to make an audible alert when the PIR sensor is triggered.
- If you want to get extra fancy, make a different sound alert if Triggers gets larger than some number you choose.
- Once you’ve tested your code, use the Load EEPROM & Run button so that the application will be available after you turn off power.
- Disconnect your board from the computer, and power it with a 4AA or 5 AA battery pack.
Now, your battery-powered motion sensor is ready set up and turn on to stand guard any place you want to take it!
