Make Several Decisions
Make a Decision introduced the if statement, where a code block gets executed if its if statement is true. If a program has multiple if statements that are true, more than one code block might get executed. But sometimes, you might only want one code block to execute based on a list of conditions.
For example, let’s say we want one message when a is greater than b, a different message when a is less than b, and a third message if a is equal to b.
Another example you might see later is a robot with two contact sensors. It needs to back up and turn in different directions depending on whether both sensors are pressed, or just the left, or just the right.
- Use the Open Project button to open Decision Chain.side.
- Examine Decision Chain.c and predict what result you think it will display with a = 25 and b = 17. Repeat for a = 17 and b = 25 as well as for a = 25 and b = 25.
- Set the power switch to position 1 if it isn’t already (if applicable for your board).
- Use the Run with Terminal button to test your results. Make sure to try all three combinations of a and b values.
/*
  Decision Chain.c

  Check a series of conditions, but only act on the first one that's true.
*/

#include "simpletools.h"                      // Include simpletools

int main()                                    // main function
{
  pause(1000);                                // Wait 1 s for computer connection
  int a = 25;                                 // Initialize a variable to 25
  int b = 17;                                 // Initialize b variable to 17
  print("a = %d, b = %dn", a, b);            // Print all
  if(a > b)                                   // If a > b condition is true
  {
    print("a is larger n");                  // Then print this message
  }
  else if (a < b)                             // a > b not true? check a < b
  {
    print("b is larger n");                  // If true, print this instead
  }
  else                                        // Nothing else true?
  {
    print("a equals b");                      // Print this
  }
}
How it Works
The if…else if…else statement first checks if a is greater than b with if(a > b). If it is, then the print(“a is larger n”) gets executed. An important point here is that it skips checking any of the other conditions in the statement and moves on to whatever code might be below the else{…} block. Now, if a is not greater than b, it does not execute print(“a is larger n”) and instead moves on to check the next condition: if a is less than b with if(a < b){…}. If that’s true, it’ll print that message instead. If that’s not true either, the code will move on to the else condition, which is an optional catch-all if nothing else is true.
Did You Know?
- You can add more else if statements between the first if and the last else catch-all.
- The else catch-all block is optional.
Try This
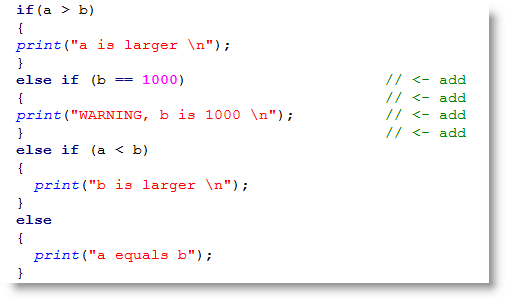
There are two else if conditions in the if…else if…else block below . The first one checks for a special condition, which is when b has reached or exceeded 1000. In this case, the program just displays a warning message. However in other applications such as a robot or factory equipment, if might have lots more code for remedying that special condition. Now, if b is greater than a, but it’s not equal to 1000, the code just displays the standard message.
- Click the Save Project As button and save your project as Decision Chain Add Else If.side.
- Add the new else if code block in the excerpt below.
- Change b to 1000 and click the Run Project with Console button to verify the result.
- Change b to 999 and re-run the program. Did the SimpleIDE terminal for both cases match your expectations?
Your Turn
- Modify your program to display whether a number is positive, negative, or zero.
Make a Decision introduced the if statement, where a code block gets executed if its if statement is true. If a program has multiple if statements that are true, more than one code block might get executed. But sometimes, you might only want one code block to execute based on a list of conditions.
For example, let’s say we want one message when a is greater than b, a different message when a is less than b, and a third message if a is equal to b.
Another example you might see later is a robot with two contact sensors. It needs to back up and turn in different directions depending on whether both sensors are pressed, or just the left, or just the right.
- Use the Open Project button to open Decision Chain.side.
- Examine Decision Chain.c and predict what result you think it will display with a = 25 and b = 17. Repeat for a = 17 and b = 25 as well as for a = 25 and b = 25.
- Set the power switch to position 1 if it isn’t already (if applicable for your board).
- Use the Run with Terminal button to test your results. Make sure to try all three combinations of a and b values.
/*
  Decision Chain.c

  Check a series of conditions, but only act on the first one that's true.
*/

#include "simpletools.h"                      // Include simpletools

int main()                                    // main function
{
  pause(1000);                                // Wait 1 s for computer connection
  int a = 25;                                 // Initialize a variable to 25
  int b = 17;                                 // Initialize b variable to 17
  print("a = %d, b = %d\n", a, b);            // Print all
  if(a > b)                                   // If a > b condition is true
  {
    print("a is larger \n");                  // Then print this message
  }
  else if (a < b)                             // a > b not true? check a < b
  {
    print("b is larger \n");                  // If true, print this instead
  }
  else                                        // Nothing else true?
  {
    print("a equals b");                      // Print this
  }
}
How it Works
The if…else if…else statement first checks if a is greater than b with if(a > b). If it is, then the print(“a is larger \n”) gets executed. An important point here is that it skips checking any of the other conditions in the statement and moves on to whatever code might be below the else{…} block. Now, if a is not greater than b, it does not execute print(“a is larger \n”) and instead moves on to check the next condition: if a is less than b with if(a < b){…}. If that’s true, it’ll print that message instead. If that’s not true either, the code will move on to the else condition, which is an optional catch-all if nothing else is true.
Did You Know?
- You can add more else if statements between the first if and the last else catch-all.
- The else catch-all block is optional.
Try This
There are two else if conditions in the if…else if…else block below . The first one checks for a special condition, which is when b has reached or exceeded 1000. In this case, the program just displays a warning message. However in other applications such as a robot or factory equipment, if might have lots more code for remedying that special condition. Now, if b is greater than a, but it’s not equal to 1000, the code just displays the standard message.
- Click the Save Project As button and save your project as Decision Chain Add Else If.side.
- Add the new else if code block in the excerpt below.
- Change b to 1000 and click the Run Project with Console button to verify the result.
- Change b to 999 and re-run the program. Did the SimpleIDE terminal for both cases match your expectations?
Your Turn
- Modify your program to display whether a number is positive, negative, or zero.