Simple Hello Message
This C program will make the Propeller microcontroller send a “Hello!!!” message to the SimpleIDE Terminal on your computer.
- Click the Open Project button.
- Navigate to My Documents -> SimpleIDE -> Learn -> Examples -> C Intro -> Basics.
- Select Hello Message, and click Open.
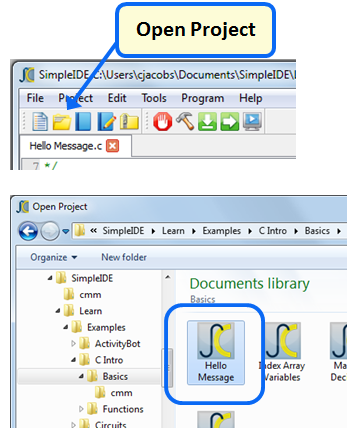
When SimpleIDE opens the project, it will open Hello Message.c into its text editor pane.
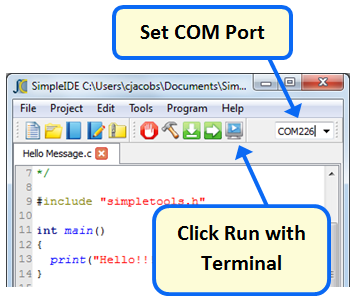
- Click the Com Port dropdown on the right and select the com port your board is connected to. If in doubt, disconnect/reconnect the board and click it again to see which one disappeared/reappeared.
- Set the power switch to position 1 (if applicable for your board).
- Click the Run with Terminal button.
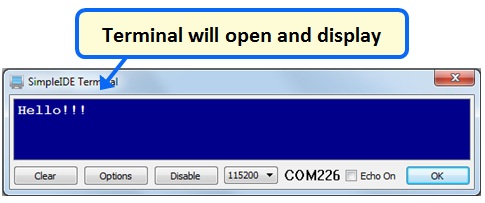
A single “Hello!!!” message should appear in the Simple IDE Terminal.
How Hello Message.c Works
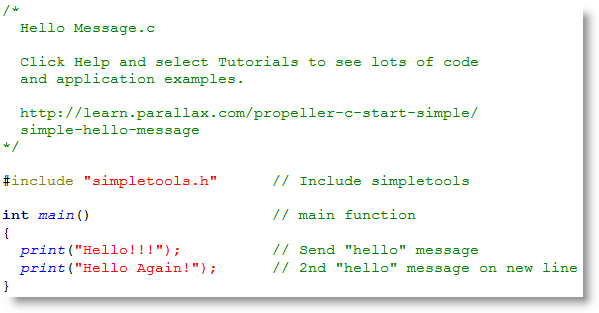
The print(“Hello!!!”) makes the Propeller chip send its message to your computer through its programming port. The SimpleIDE terminal displays the message on your computer screen.
The print(“Hello!!!”) is followed by a semicolon ;. The semicolon is what tells the PropGCC compiler that it has reached the end of an instruction statement.
The print statement is inside curly braces {} below main(), and so we call it part of the main function’s code block. A C program always starts with the first statement in the main function.
Print is also a function, but it is stored in other files called library files. Later on, you’ll get to search for libraries that contain useful functions to add to your own projects. For now, just keep in mind that your program needs #include “simpletools.h” because it has information about print, and many other useful functions.
Try This
The program has one statement: print(“Hello!!!”);. Let’s save this project under a new name, and add a second print statement.
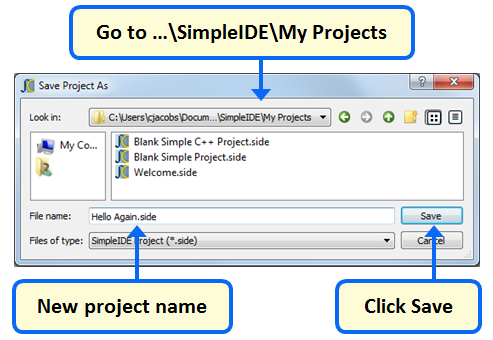
- Click the Save Project As button.

- Browse to My Documents\SimpleIDE\My Projects.
- Type Hello Again into the File name field.
- Click the Save button.
- Modify the main function so that it looks like this:

- Click the Run with Terminal button, and observe the output.
- What effect does the \n have? Delete \n, then run the program a third time.
Saving Programs
SimpleIDE saves your program each time it compiles. As you progress through these tutorials you will notice that we ask you to save a new copy of any program you’ll be modifying to prevent you from overwriting the original project with one you have changed.
Did You Know?
C is case-sensitive — You have to use the correct capitalization when programming in C. If you make an error, such as typing Print for example, SimpleIDE will let you know:

newline — \n is called the newline character, and it is an example of a control character used for positioning a cursor in a serial terminal.
int (main) — the int in int main() is part of the C compiler’s programming convention. It is used no matter what you include inside the main function’s code block. You will learn more about how int is used in other ways as you go through the tutorials.
Your Turn
Comments are notes about your code that help explain it to other people that have to work with it. Also, it is good to leave comments as notes to yourself about what you were doing in case you need a reminder days (or months or years) later.
If you want to comment all or part of a single line, use two forward slashes //. Everything to the right of // will be ignored by the C compiler. Block comments can span multiple lines. They start with /* and end with */, and everything in between will be ignored by the C compiler.
- Click the Save As Project button again and save the project as Hello Again Commented.
- Add the comments shown below.
- Run it again to verify that the comments do not have any actual effect on the way your program runs. (If your comment prevents the program from running, you may have a typing error!)