Skip to content
Parallax Learn (Stage)

Parallax Learn (Stage)

This is the staging site. Please see https://learn.parallax.com for the official site.

  • Welcome
  • Tutorials
        • Tutorial Series head tag

          Tutorial Series
        • Tutorial Series

          The special, classroom-ready series pages are organized collections of tutorials for our most popular hardware and/or languages. The tutorials for each topic are conveniently accessible from a single page, shown in the order it is recommended that they be completed.
        • Robotics Series Head tag

          Robotics Series
        • Robotics Series

          • Artificial Intelligence Tutorial Series
          • Cybersecurity: Radio Data tutorialCybersecurity Tutorial Series
          • cyber:bot Tutorial Series
          • Boe-Bot Tutorial SeriesBoe-Bot Tutorial Series
          • Arduino Shield-Bot Tutorial Series
          • ActivityBot with C TutorialsActivityBot with C Tutorials
          • ActivityBot with BlocklyProp Tutorial SeriesActivityBot with BlocklyProp Tutorial Series
          • Scribbler 3 Tutorial SeriesScribbler 3 Tutorial Series
        • Electronics & Programming Series Head tag

          Electronics & Programming Series
          • BS2 Board of Education Tutorial SeriesBS2 Board of Education Tutorial Series
          • Propeller C-Language BasicsPropeller C Basics and Projects
          • FLiP Try-It Kit C Tutorial SeriesFLiP Try-It Kit C Tutorial Series
          • FLiP Try-It Kit BlocklyProp TutorialsFLiP Try-It Kit BlocklyProp Tutorials
          • Badge WX Tutorial SeriesBadge WX Tutorial Series
          • Propeller BlocklyProp Basics and ProjectsPropeller BlocklyProp Basics and Projects
          • View All Tutorial Series »
        • Browse Tutorials
        • Browse Tutorials

          Individual tutorials sorted by robot or kit, and language.
        • By Robot or Kit
          • ActivityBot
          • SumoBot WX
          • Boe-Bot
          • Shield-Bot
          • cyber:bot
          • Badge WX
          • ELEV-8
          • ARLO
        • By Language
        • By Language

          • Propeller C
          • Arduino
          • BlocklyProp
          • PBASIC
          • Python
          • View All Tutorials »
  • Educators
  • Reference
  • Downloads
  • Home
  • All Courses
  • Robotics with the Board of Education Shield for Arduino

Robotics with the Board of Education Shield for Arduino

Activity 1: Build and Test the Object Detectors

In this activity, you will build and test infrared object detectors for the BOE Shield-Bot.
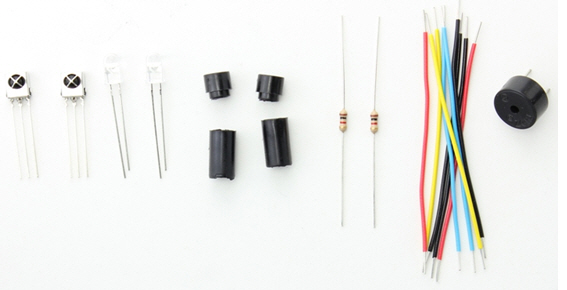
Parts List

(2)  IR receivers
(2)  IR LEDs (clear case)
(2)  IR LED shield assemblies
(2)  Resistors, 220 Ω (red-red-brown)
(2)  Resistors, 2 kΩ (red-black-red)
(misc) Jumper wires

  • Gather the parts in the Parts List, using the drawings below to help identify the infrared receivers, LEDs, and shield assembly parts.

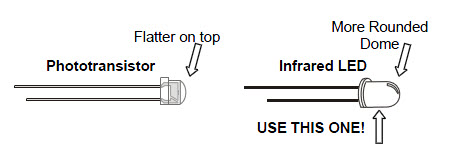
  • Check the figure below to make sure you have selected infrared LEDs and not phototransistors.  The infrared LED has a taller and more rounded plastic dome, and is shown on the right side of this drawing.

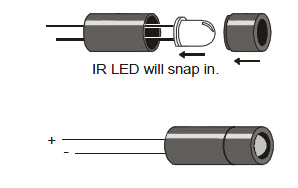
Assemble the IR Headlights

  • Insert the infrared LED into the LED standoff (the larger of the two pieces) as shown below.
  • Make sure the IR LED snaps into the LED standoff.
  • Slip the short tube over the IR LED’s clear plastic case.  The ring on one end of the tube should fit right into the LED standoff.
  • Use a small piece of clear tape to secure the two pieces so the shield assembly doesn’t separate during use.

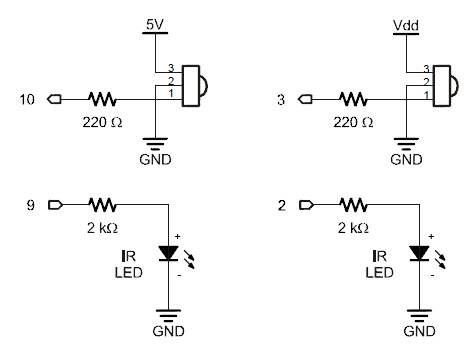
IR Object Detection Circuit

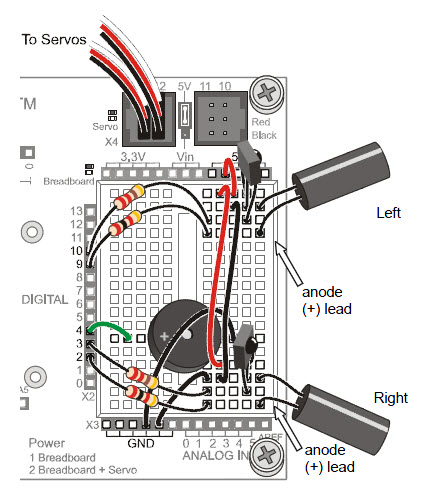
The next figures show the IR object detection schematic wiring diagram.  One IR object detector (IR LED and receiver pair) is mounted on each corner of the breadboard closest to the very front of the BOE Shield-Bot. 

  • Disconnect the power and programming cables.
  • Build the circuit in the schematic below, using the wiring diagram as a reference for parts placement.
  • Note that the anode lead of each IR LED connects to a 2 kΩ resistor.  The cathode lead plugs into the same breadboard row as an IR detector’s center pin, and that row is connected to GND with a jumper wire.

Watch your IR LED anodes and cathodes!  
The anode lead is the longer lead on an IR LED by convention. The cathode lead is shorter and mounted in the plastic case closer to its flat spot.  These are the same conventions as the red LEDs we have been using.


Printer-friendly version
Infrared Light Signals
Prev
Object Detection Test Code
Next

DISCUSSION FORUMS | PARALLAX INC. STORE

About | Terms of Use | Feedback: learn@parallax.com | Copyright©Parallax Inc. 2024

© 2025 Parallax Learn (Stage) • Built with GeneratePress