Skip to content
Parallax Learn (Stage)

Parallax Learn (Stage)

This is the staging site. Please see https://learn.parallax.com for the official site.

  • Welcome
  • Tutorials
        • Tutorial Series head tag

          Tutorial Series
        • Tutorial Series

          The special, classroom-ready series pages are organized collections of tutorials for our most popular hardware and/or languages. The tutorials for each topic are conveniently accessible from a single page, shown in the order it is recommended that they be completed.
        • Robotics Series Head tag

          Robotics Series
        • Robotics Series

          • Artificial Intelligence Tutorial Series
          • Cybersecurity: Radio Data tutorialCybersecurity Tutorial Series
          • cyber:bot Tutorial Series
          • Boe-Bot Tutorial SeriesBoe-Bot Tutorial Series
          • Arduino Shield-Bot Tutorial Series
          • ActivityBot with C TutorialsActivityBot with C Tutorials
          • ActivityBot with BlocklyProp Tutorial SeriesActivityBot with BlocklyProp Tutorial Series
          • Scribbler 3 Tutorial SeriesScribbler 3 Tutorial Series
        • Electronics & Programming Series Head tag

          Electronics & Programming Series
          • BS2 Board of Education Tutorial SeriesBS2 Board of Education Tutorial Series
          • Propeller C-Language BasicsPropeller C Basics and Projects
          • FLiP Try-It Kit C Tutorial SeriesFLiP Try-It Kit C Tutorial Series
          • FLiP Try-It Kit BlocklyProp TutorialsFLiP Try-It Kit BlocklyProp Tutorials
          • Badge WX Tutorial SeriesBadge WX Tutorial Series
          • Propeller BlocklyProp Basics and ProjectsPropeller BlocklyProp Basics and Projects
          • View All Tutorial Series »
        • Browse Tutorials
        • Browse Tutorials

          Individual tutorials sorted by robot or kit, and language.
        • By Robot or Kit
          • ActivityBot
          • SumoBot WX
          • Boe-Bot
          • Shield-Bot
          • cyber:bot
          • Badge WX
          • ELEV-8
          • ARLO
        • By Language
        • By Language

          • Propeller C
          • Arduino
          • BlocklyProp
          • PBASIC
          • Python
          • View All Tutorials »
  • Educators
  • Reference
  • Downloads
  • Home
  • All Courses
  • Robotics with the Board of Education Shield for Arduino

Robotics with the Board of Education Shield for Arduino

Activity 1: Simple Light to Voltage Sensor

Imagine that your BOE Shield-Bot is navigating a course, and there’s a bright light at the end.  Your robot’s final task in the course is to stop underneath that bright light.  There’s a simple phototransistor circuit you can use that lets the Arduino know it detected bright light with a binary‑1, or ambient light with a binary-0.  Incandescent bulbs in desk lamps and flashlights make the best bright-light sources. Compact fluorescent and LED light sources are not as easy for the circuit in this activity to recognize.

Ambient means ‘existing or present on all sides’ according to Merriam Webster’s dictionary.  For the light level in a room, think about ambient light as the overall level of brightness.

Parts List

(1) phototransistor
(2) jumper wires
(1) resistor, 2 kΩ (red-black-red)
(1) incandescent or fluorescent flashlight or desk lamp

After some testing, and depending on the light conditions in your robotics area, you might end up replacing the 2 kΩ resistor with one of these resistors, so keep them handy:

(1) resistor, 220 Ω (red-red-brown)
(1) resistor, 470 Ω (yellow-violet-brown)
(1) resistor, 1 kΩ (brown-black-red)
(1) resistor, 4.7 kΩ (yellow-violet-red)
(1) resistor, 10 kΩ (brown-black-orange)

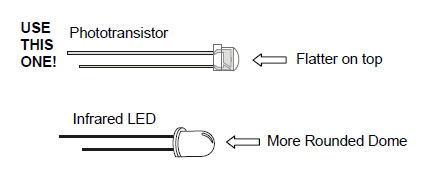
The drawing below will help you tell apart the phototransistor and infrared LED, since they look similar.

Building the Bright Light Detector

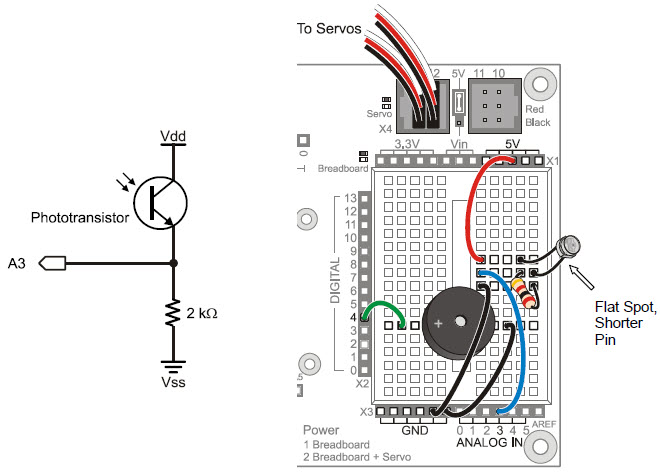
The schematic and wiring diagram below show the schematic and wiring diagram of a circuit very similar to the ones in streetlights that turn on automatically at night.  The circuit outputs a voltage that varies depending on how much light shines on the phototransistor.  The Arduino will monitor the voltage level with one of its analog input pins. 

  • Disconnect the battery pack and programming cable from your Arduino, and set the BOE Shield’s switch to 0.
  • Remove the whisker circuits, but leave the piezospeaker circuit in place.
  • Build the circuit shown, using the 2 kΩ resistor.
  • Double-check to make sure you connect the phototransistor’s emitter lead (by the flat spot) to the resistor, and its collector to 5V.
  • Also double-check that the phototransistor’s leads are not touching each other.


Printer-friendly version
Introducing the Phototransistor
Prev
Example Sketch: PhototransistorVoltage
Next

DISCUSSION FORUMS | PARALLAX INC. STORE

About | Terms of Use | Feedback: learn@parallax.com | Copyright©Parallax Inc. 2024

© 2025 Parallax Learn (Stage) • Built with GeneratePress