Skip to content
Parallax Learn (Stage)

Parallax Learn (Stage)

This is the staging site. Please see https://learn.parallax.com for the official site.

  • Welcome
  • Tutorials
        • Tutorial Series head tag

          Tutorial Series
        • Tutorial Series

          The special, classroom-ready series pages are organized collections of tutorials for our most popular hardware and/or languages. The tutorials for each topic are conveniently accessible from a single page, shown in the order it is recommended that they be completed.
        • Robotics Series Head tag

          Robotics Series
        • Robotics Series

          • Artificial Intelligence Tutorial Series
          • Cybersecurity: Radio Data tutorialCybersecurity Tutorial Series
          • cyber:bot Tutorial Series
          • Boe-Bot Tutorial SeriesBoe-Bot Tutorial Series
          • Arduino Shield-Bot Tutorial Series
          • ActivityBot with C TutorialsActivityBot with C Tutorials
          • ActivityBot with BlocklyProp Tutorial SeriesActivityBot with BlocklyProp Tutorial Series
          • Scribbler 3 Tutorial SeriesScribbler 3 Tutorial Series
        • Electronics & Programming Series Head tag

          Electronics & Programming Series
          • BS2 Board of Education Tutorial SeriesBS2 Board of Education Tutorial Series
          • Propeller C-Language BasicsPropeller C Basics and Projects
          • FLiP Try-It Kit C Tutorial SeriesFLiP Try-It Kit C Tutorial Series
          • FLiP Try-It Kit BlocklyProp TutorialsFLiP Try-It Kit BlocklyProp Tutorials
          • Badge WX Tutorial SeriesBadge WX Tutorial Series
          • Propeller BlocklyProp Basics and ProjectsPropeller BlocklyProp Basics and Projects
          • View All Tutorial Series »
        • Browse Tutorials
        • Browse Tutorials

          Individual tutorials sorted by robot or kit, and language.
        • By Robot or Kit
          • ActivityBot
          • SumoBot WX
          • Boe-Bot
          • Shield-Bot
          • cyber:bot
          • Badge WX
          • ELEV-8
          • ARLO
        • By Language
        • By Language

          • Propeller C
          • Arduino
          • BlocklyProp
          • PBASIC
          • Python
          • View All Tutorials »
  • Educators
  • Reference
  • Downloads
  • Home
  • All Courses
  • Robotics with the Board of Education Shield for Arduino

Robotics with the Board of Education Shield for Arduino

Activity 3: LED Servo Signal Monitors

The high and low signals that control servo motors must last for very precise periods of time.  That’s because a servo motor measures how long the signal stays high, and uses that as an instruction for how fast, and in which direction, to turn its motor. 

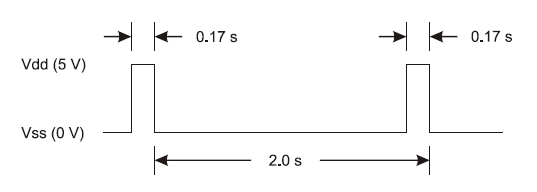
This timing diagram shows a servo signal that would make your Shield-Bot’s wheel turn full speed counterclockwise.  There’s one big difference though: all the signals in this timing diagram last 100 times longer than they would if they were controlling a servo.  This slows it down enough so that we can see what’s going on.

Example Sketch: ServoSlowMoCcw

  • Enter, save, and upload ServoSlowMoCcw to the Arduino. 
  • Verify that the pin 13 LED circuit pulses briefly every two seconds.
/*
    Robotics with the BOE Shield - ServoSlowMoCcw
    Send 1/100th speed servo signals for viewing with an LED.
 */

void setup()                                 // Built in initialization block
{
  pinMode(13, OUTPUT);                       // Set digital pin 13 -> output
}  
 
void loop()                                  // Main loop auto-repeats
{                                         
  digitalWrite(13, HIGH);                    // Pin 13 = 5 V, LED emits light
  delay(170);                                // ..for 0.17 seconds
  digitalWrite(13, LOW);                     // Pin 13 = 0 V, LED no light
  delay(1830);                               // ..for 1.83 seconds
}

Your Turn – Two Steps to Servo Signal

Alright, how about 1/10th speed instead of 1/100th speed?

  • Reduce delay(170) to delay(17), and delay(1830) to delay(183), and re-upload the sketch.

Is the LED blinking 10 times faster now?  Divide by 10 again for a full speed servo signal—we’ll have to round the numbers a bit: 

  • Change delay(17) to delay(2), and delay(183) to delay(18), then upload the modified sketch.

Now you can see what the servo signal looks like with the indicator LED.  The LED is flickering so fast, it’s just a glow.  Since the high signal is 2 ms instead of 1.7 ms, it’ll be a little brighter than the actual servo control signal—the light is spending more time on.  We could use this signal and programming technique to control a servo, but there’s an easier, more precise way. Let’s try it with LEDs first.


Printer-friendly version
Introducing the Timing Diagram
Prev
How to Use the Arduino Servo Library
Next

DISCUSSION FORUMS | PARALLAX INC. STORE

About | Terms of Use | Feedback: learn@parallax.com | Copyright©Parallax Inc. 2024

© 2025 Parallax Learn (Stage) • Built with GeneratePress