Skip to content
Parallax Learn (Stage)

Parallax Learn (Stage)

This is the staging site. Please see https://learn.parallax.com for the official site.

  • Welcome
  • Tutorials
        • Tutorial Series head tag

          Tutorial Series
        • Tutorial Series

          The special, classroom-ready series pages are organized collections of tutorials for our most popular hardware and/or languages. The tutorials for each topic are conveniently accessible from a single page, shown in the order it is recommended that they be completed.
        • Robotics Series Head tag

          Robotics Series
        • Robotics Series

          • Artificial Intelligence Tutorial Series
          • Cybersecurity: Radio Data tutorialCybersecurity Tutorial Series
          • cyber:bot Tutorial Series
          • Boe-Bot Tutorial SeriesBoe-Bot Tutorial Series
          • Arduino Shield-Bot Tutorial Series
          • ActivityBot with C TutorialsActivityBot with C Tutorials
          • ActivityBot with BlocklyProp Tutorial SeriesActivityBot with BlocklyProp Tutorial Series
          • Scribbler 3 Tutorial SeriesScribbler 3 Tutorial Series
        • Electronics & Programming Series Head tag

          Electronics & Programming Series
          • BS2 Board of Education Tutorial SeriesBS2 Board of Education Tutorial Series
          • Propeller C-Language BasicsPropeller C Basics and Projects
          • FLiP Try-It Kit C Tutorial SeriesFLiP Try-It Kit C Tutorial Series
          • FLiP Try-It Kit BlocklyProp TutorialsFLiP Try-It Kit BlocklyProp Tutorials
          • Badge WX Tutorial SeriesBadge WX Tutorial Series
          • Propeller BlocklyProp Basics and ProjectsPropeller BlocklyProp Basics and Projects
          • View All Tutorial Series »
        • Browse Tutorials
        • Browse Tutorials

          Individual tutorials sorted by robot or kit, and language.
        • By Robot or Kit
          • ActivityBot
          • SumoBot WX
          • Boe-Bot
          • Shield-Bot
          • cyber:bot
          • Badge WX
          • ELEV-8
          • ARLO
        • By Language
        • By Language

          • Propeller C
          • Arduino
          • BlocklyProp
          • PBASIC
          • Python
          • View All Tutorials »
  • Educators
  • Reference
  • Downloads
  • Home
  • All Courses
  • Robotics with the Board of Education Shield for Arduino

Robotics with the Board of Education Shield for Arduino

How a Sketch Makes the LED Turn On and Off

Let’s start with a sketch that makes the LED circuit connected to digital pin 13 turn on/off.  First, your sketch has to tell the Arduino to set the direction of pin 13 to output, using the pinMode function: pinMode(pin, mode).  The pin parameter is the number of a digital I/O pin, and mode must be either INPUT or OUTPUT.

void setup()                      // Built-in initialization block
{
  pinMode(13, OUTPUT);            // Set digital pin 13 -> output
}

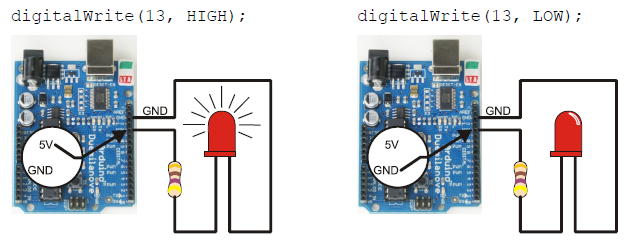
Now that digital pin 13 is set to output, we can use digitalWrite to turn the LED light on and off.  Take a look at the picture below.  On the left, digitalWrite(13, HIGH) makes the Arduino’s microcontroller connect digital pin 13 to 5 V, which turns on the LED.  On the right, it shows how digitalWrite(13, LOW) makes it connect pin 13 to GND (0 V) to turn the LED off.

Here’s the loop function from the next sketch.  First, digitalWrite(13, HIGH) turns the light on, delay(500) keeps it on for a half-second. Then  digitalWrite(13, LOW) turns it off, and that’s also followed by delay(500).  Since it’s inside the loop function’s block, the statements will repeat automatically.  The result?  The light will flash on/off once every second.

void loop()                        // Main loop auto-repeats
{                                         
  digitalWrite(13, HIGH);          // Pin 13 = 5 V, LED emits light
  delay(500);                      // ..for 0.5 seconds
  digitalWrite(13, LOW);           // Pin 13 = 0 V, LED no light
  delay(500);                      // ..for 0.5 seconds
}

Example Sketch: HighLowLed

  • Reconnect the programming cable to your board.
  • Enter, save, and upload HighLowLed to your Arduino.
  • Verify that the pin 13 LED turns on and off, once every second. (You may see the LED flicker a few times before it settles down into a steady blinking pattern. This happens when reprogramming the Arduino.)
/*
 Robotics with the BOE Shield - HighLowLed
 Turn LED connected to digital pin 13 on/off once every second.
 */

void setup()                                 // Built-in initialization block
{
  pinMode(13, OUTPUT);                       // Set digital pin 13 -> output
}  
 
void loop()                                  // Main loop auto-repeats
{                                         
  digitalWrite(13, HIGH);                    // Pin 13 = 5 V, LED emits light
  delay(500);                                // ..for 0.5 seconds
  digitalWrite(13, LOW);                     // Pin 13 = 0 V, LED no light
  delay(500);                                // ..for 0.5 seconds
}  

Printer-friendly version
LED Test Circuit
Prev
Introducing the Timing Diagram
Next

DISCUSSION FORUMS | PARALLAX INC. STORE

About | Terms of Use | Feedback: learn@parallax.com | Copyright©Parallax Inc. 2024

© 2025 Parallax Learn (Stage) • Built with GeneratePress