Skip to content
Parallax Learn (Stage)

Parallax Learn (Stage)

This is the staging site. Please see https://learn.parallax.com for the official site.

  • Welcome
  • Tutorials
        • Tutorial Series head tag

          Tutorial Series
        • Tutorial Series

          The special, classroom-ready series pages are organized collections of tutorials for our most popular hardware and/or languages. The tutorials for each topic are conveniently accessible from a single page, shown in the order it is recommended that they be completed.
        • Robotics Series Head tag

          Robotics Series
        • Robotics Series

          • Artificial Intelligence Tutorial Series
          • Cybersecurity: Radio Data tutorialCybersecurity Tutorial Series
          • cyber:bot Tutorial Series
          • Boe-Bot Tutorial SeriesBoe-Bot Tutorial Series
          • Arduino Shield-Bot Tutorial Series
          • ActivityBot with C TutorialsActivityBot with C Tutorials
          • ActivityBot with BlocklyProp Tutorial SeriesActivityBot with BlocklyProp Tutorial Series
          • Scribbler 3 Tutorial SeriesScribbler 3 Tutorial Series
        • Electronics & Programming Series Head tag

          Electronics & Programming Series
          • BS2 Board of Education Tutorial SeriesBS2 Board of Education Tutorial Series
          • Propeller C-Language BasicsPropeller C Basics and Projects
          • FLiP Try-It Kit C Tutorial SeriesFLiP Try-It Kit C Tutorial Series
          • FLiP Try-It Kit BlocklyProp TutorialsFLiP Try-It Kit BlocklyProp Tutorials
          • Badge WX Tutorial SeriesBadge WX Tutorial Series
          • Propeller BlocklyProp Basics and ProjectsPropeller BlocklyProp Basics and Projects
          • View All Tutorial Series »
        • Browse Tutorials
        • Browse Tutorials

          Individual tutorials sorted by robot or kit, and language.
        • By Robot or Kit
          • ActivityBot
          • SumoBot WX
          • Boe-Bot
          • Shield-Bot
          • cyber:bot
          • Badge WX
          • ELEV-8
          • ARLO
        • By Language
        • By Language

          • Propeller C
          • Arduino
          • BlocklyProp
          • PBASIC
          • Python
          • View All Tutorials »
  • Educators
  • Reference
  • Downloads
  • Home
  • All Courses
  • Robotics with the Board of Education Shield for Arduino

Robotics with the Board of Education Shield for Arduino

How the Phototransistor Circuit Works

A resistor “resists” the flow of current.  Voltage in a circuit with a resistor can be likened to water pressure.  For a given amount of electric current, more voltage (pressure) is lost across a larger resistor than a smaller resistor that has the same amount of current passing through it.  If you instead keep the resistance constant and vary the current, you can measure a larger voltage (pressure drop) across the same resistor with more current, or less voltage with less current.

The micro:bit module’s analog inputs are invisible to the phototransistor circuit.  So, a circuit plugged into the A/D2  socket on the cyber:bot board is monitored by the micro:bit, but the micro:bit has no affect on the circuit.

Take a look at the circuit below.  With 3.3 volts (3.3 V) at the top and GND (0 V) at the bottom of the circuit, 3.3 V of electrical pressure (voltage) makes the supply of electrons in the cyber:bot’s batteries want to flow through it.
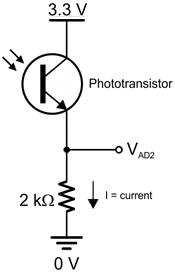
The reason the voltage at A/D2 (VAD2)  changes with light is because the phototransistor lets more current pass when more light shines on it, or less current pass with less light.  That current, which is labeled I in this circuit, also has to pass through the resistor.  When more current passes through a resistor, the voltage across it will be higher.  When less current passes, the voltage will be lower. Since one end of the resistor is tied to GND = 0 V, the voltage at the VAD2 end goes up with more current and down with less current.

If you replace the 2 kΩ resistor with a 1 kΩ resistor, VAD2 will see smaller values for the same currents.  It will take twice as much current to get VAD2 to the same voltage level, which means the shadow will have to be twice as dark to reach the 0.1 V level, which is the default voltage in the script halt_under_shadow that makes the cyber:bot stop.

So, a smaller resistor in series with the phototransistor makes the circuit less sensitive to light.  If you instead replace the 2 kΩ resistor with a 10 kΩ resistor, VAD2 will be 5 times larger with the same current, and it’ll only take 1/5th the light to generate 1/5th the current to get VAD2 past the 0.1 V level.  So, a larger resistor makes the circuit more sensitive to light.

Connected in Series  — When two or more elements are connected end-to-end, they are connected in series.  The phototransistor and resistor in this circuit are connected in series.


Printer-friendly version

DISCUSSION FORUMS | PARALLAX INC. STORE

About | Terms of Use | Feedback: learn@parallax.com | Copyright©Parallax Inc. 2024

© 2025 Parallax Learn (Stage) • Built with GeneratePress