Skip to content
Parallax Learn (Stage)

Parallax Learn (Stage)

This is the staging site. Please see https://learn.parallax.com for the official site.

  • Welcome
  • Tutorials
        • Tutorial Series head tag

          Tutorial Series
        • Tutorial Series

          The special, classroom-ready series pages are organized collections of tutorials for our most popular hardware and/or languages. The tutorials for each topic are conveniently accessible from a single page, shown in the order it is recommended that they be completed.
        • Robotics Series Head tag

          Robotics Series
        • Robotics Series

          • Artificial Intelligence Tutorial Series
          • Cybersecurity: Radio Data tutorialCybersecurity Tutorial Series
          • cyber:bot Tutorial Series
          • Boe-Bot Tutorial SeriesBoe-Bot Tutorial Series
          • Arduino Shield-Bot Tutorial Series
          • ActivityBot with C TutorialsActivityBot with C Tutorials
          • ActivityBot with BlocklyProp Tutorial SeriesActivityBot with BlocklyProp Tutorial Series
          • Scribbler 3 Tutorial SeriesScribbler 3 Tutorial Series
        • Electronics & Programming Series Head tag

          Electronics & Programming Series
          • BS2 Board of Education Tutorial SeriesBS2 Board of Education Tutorial Series
          • Propeller C-Language BasicsPropeller C Basics and Projects
          • FLiP Try-It Kit C Tutorial SeriesFLiP Try-It Kit C Tutorial Series
          • FLiP Try-It Kit BlocklyProp TutorialsFLiP Try-It Kit BlocklyProp Tutorials
          • Badge WX Tutorial SeriesBadge WX Tutorial Series
          • Propeller BlocklyProp Basics and ProjectsPropeller BlocklyProp Basics and Projects
          • View All Tutorial Series »
        • Browse Tutorials
        • Browse Tutorials

          Individual tutorials sorted by robot or kit, and language.
        • By Robot or Kit
          • ActivityBot
          • SumoBot WX
          • Boe-Bot
          • Shield-Bot
          • cyber:bot
          • Badge WX
          • ELEV-8
          • ARLO
        • By Language
        • By Language

          • Propeller C
          • Arduino
          • BlocklyProp
          • PBASIC
          • Python
          • View All Tutorials »
  • Educators
  • Reference
  • Downloads
  • Home
  • All Courses
  • Robotics with the Board of Education Shield for Arduino

Robotics with the Board of Education Shield for Arduino

Introducing the Phototransistor

A transistor is like a valve that regulates the amount of electric current that passes through two of its three terminals.  The third terminal controls just how much current passes through the other two.  Depending on the type of transistor, the current flow can be controlled by voltage, current, or in the case of the phototransistor, by light.

The drawing below shows the schematic and part drawing of the phototransistor in your Robotics Shield Kit.  The brightness of the light shining on the phototransistor’s base (B) terminal determines how much current it will allow to pass into its collector (C) terminal, and out through its emitter (E) terminal.  Brighter light results in more current; less-bright light results in less current.

The phototransistor looks a little bit like an LED.  The two devices do have two similarities.  First, if you connect the phototransistor in the circuit backwards, it won’t work right.  Second, it also has two different length pins and a flat spot on its plastic case for identifying its terminals.  The longer of the two pins indicates the phototransistor’s collector terminal. The shorter pin indicates the emitter, and it connects closer to a flat spot on the phototransistor’s clear plastic case.

Light Waves

In the ocean, you can measure the distance between the peaks of two adjacent waves in feet or meters.  With light, which also travels in waves, the distance between adjacent peaks is measured in nanometers (nm) which are billionths of meters.  The figure below shows the wavelengths for colors of light we are familiar with, along with some the human eye cannot detect, such as ultraviolet and infrared.

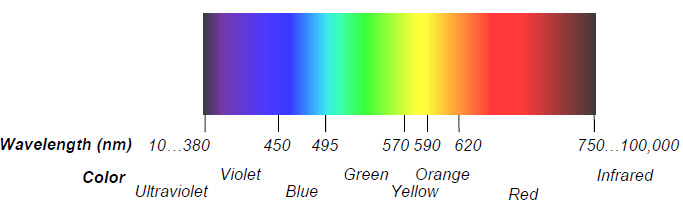
The phototransistor in the Robotics Shield Kit is most sensitive to 850 nm wavelengths, which is in the infrared range.  Infrared light is not visible to the human eye, but many different light sources emit considerable amounts of it, including halogen and incandescent lamps and especially the sun.  This phototransistor also responds to visible light, though it’s less sensitive, especially to wavelengths below 450 nm.

The phototransistor circuits in this chapter are designed to work well indoors, with fluorescent or incandescent lighting.  Make sure to avoid direct sunlight and direct halogen lights; they would flood the phototransistors with too much infrared light. 

  • In your robotics area, close window blinds to block direct sunlight, and point any halogen lamps upward so that the light is reflected off the ceiling.


Printer-friendly version
Chapter 6. Light-Sensitive Navigation with Phototransistors
Prev
Activity 1: Simple Light to Voltage Sensor
Next

DISCUSSION FORUMS | PARALLAX INC. STORE

About | Terms of Use | Feedback: learn@parallax.com | Copyright©Parallax Inc. 2024

© 2025 Parallax Learn (Stage) • Built with GeneratePress