Skip to content
Parallax Learn (Stage)

Parallax Learn (Stage)

This is the staging site. Please see https://learn.parallax.com for the official site.

  • Welcome
  • Tutorials
        • Tutorial Series head tag

          Tutorial Series
        • Tutorial Series

          The special, classroom-ready series pages are organized collections of tutorials for our most popular hardware and/or languages. The tutorials for each topic are conveniently accessible from a single page, shown in the order it is recommended that they be completed.
        • Robotics Series Head tag

          Robotics Series
        • Robotics Series

          • Artificial Intelligence Tutorial Series
          • Cybersecurity: Radio Data tutorialCybersecurity Tutorial Series
          • cyber:bot Tutorial Series
          • Boe-Bot Tutorial SeriesBoe-Bot Tutorial Series
          • Arduino Shield-Bot Tutorial Series
          • ActivityBot with C TutorialsActivityBot with C Tutorials
          • ActivityBot with BlocklyProp Tutorial SeriesActivityBot with BlocklyProp Tutorial Series
          • Scribbler 3 Tutorial SeriesScribbler 3 Tutorial Series
        • Electronics & Programming Series Head tag

          Electronics & Programming Series
          • BS2 Board of Education Tutorial SeriesBS2 Board of Education Tutorial Series
          • Propeller C-Language BasicsPropeller C Basics and Projects
          • FLiP Try-It Kit C Tutorial SeriesFLiP Try-It Kit C Tutorial Series
          • FLiP Try-It Kit BlocklyProp TutorialsFLiP Try-It Kit BlocklyProp Tutorials
          • Badge WX Tutorial SeriesBadge WX Tutorial Series
          • Propeller BlocklyProp Basics and ProjectsPropeller BlocklyProp Basics and Projects
          • View All Tutorial Series »
        • Browse Tutorials
        • Browse Tutorials

          Individual tutorials sorted by robot or kit, and language.
        • By Robot or Kit
          • ActivityBot
          • SumoBot WX
          • Boe-Bot
          • Shield-Bot
          • cyber:bot
          • Badge WX
          • ELEV-8
          • ARLO
        • By Language
        • By Language

          • Propeller C
          • Arduino
          • BlocklyProp
          • PBASIC
          • Python
          • View All Tutorials »
  • Educators
  • Reference
  • Downloads
  • Home
  • All Courses
  • Robotics with the Board of Education Shield for Arduino

Robotics with the Board of Education Shield for Arduino

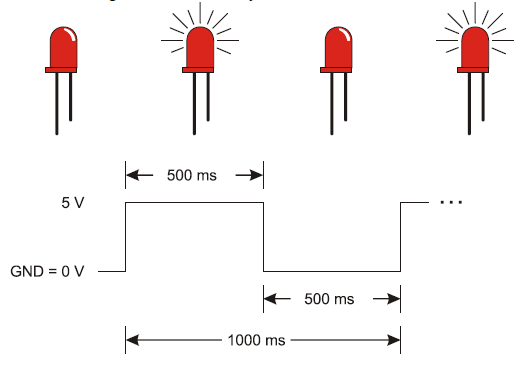
Introducing the Timing Diagram

A timing diagram is a graph that relates a signal’s high and low stages to time.  This timing diagram shows you a 1000 ms slice of the HIGH (5 V) and LOW (0 V) signals from the sketch HighLowLed.  Can you see how delay(500) is controlling the blink rate? 

Your Turn – Experiment with the Blink Rates and Both LEDs

How would you make the LED blink twice as fast?   How about reducing the delay function’s ms parameters by half?

  • Try modifying your sketch to use delay(250). Don’t forget to change it in both places!
  • How far can you reduce the delay before it just looks like the LED is dim instead of blinking on/off?

Blinking the pin 12 LED is a simple matter of changing the pin parameter in the pinMode and two digitalWrite function calls. 

  • Modify the sketch so that pinMode in the setup function uses pin 12 instead of pin 13.
  • Also modify both digitalWrite statements in the loop function to use pin 12.
  • Run it, and make sure the pin 12 LED blinks.

You can also make both LEDs blink at the same time.

  • Add statements to the sketch so that it uses pinMode twice:
  pinMode(13, OUTPUT);         // Set digital pin 13 -> output
  pinMode(12, OUTPUT);         // Set digital pin 12 -> output
  • ….and uses digitalWrite four times:
  digitalWrite(13, HIGH);      // Pin 13 = 5 V, LED emits light
  digitalWrite(12, HIGH);      // Pin 12 = 5 V, LED emits light
  delay(500);                  // ..for 0.5 seconds
  digitalWrite(13, LOW);       // Pin 13 = 0 V, LED no light
  digitalWrite(12, LOW);       // Pin 12 = 0 V, LED no light
  delay(500);                  // ..for 0.5 seconds
  • Run the modified sketch. Do both LEDs blink on and off together?

How would you modify the sketch again to turn one LED on while the other turns off? One circuit will need to receive a HIGH signal while the other receives a LOW signal. 

  • Try it!

Printer-friendly version
How a Sketch Makes the LED Turn On and Off
Prev
Activity 3: LED Servo Signal Monitors
Next

DISCUSSION FORUMS | PARALLAX INC. STORE

About | Terms of Use | Feedback: learn@parallax.com | Copyright©Parallax Inc. 2024

© 2025 Parallax Learn (Stage) • Built with GeneratePress