SD Card Data
SD cards can give your Propeller microcontroller invention some extra gigabytes of memory to work with. In this lesson, we’ll look at simple data storage and retrieval. Later, we’ll look at audio and music applications and even writing code that can run from an SD card.
Circuit
Parts
(1) 2 GB microSD card (#32319)
- Plug a microSD card into the socket.
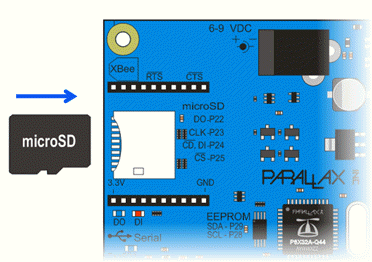
This lesson was written for the Propeller Activity Board (original or WX version). It will also work with the Propeller Board of Education. If using a different Propeller development board, connect the card reader to the Propeller I/O pins listed below in How it Works, or update the global int variables at the beginning of SD Minimal.side to match your circuit.
Test Code
The SD Minimal.side project creates/opens a file on the SD card named test.txt for writing. It then writes a string of characters into the file and closes it. It then reopens it for reading, copies the contents to a character array, which gets displayed in the SimpleIDE Terminal.
- Click SimpleIDE’s Open Project button.
- Open SD Minimal from … Documents\SimpleIDE\Learn\Examples\Devices\Memory.
- Click the Run with Terminal button.
- Verify that it displays the “Testing 123…” message.
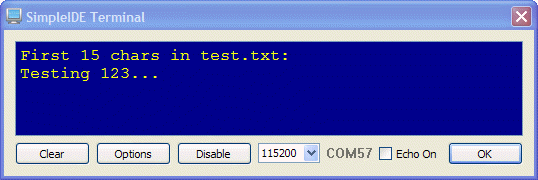
If the SimpleIDE Terminal just displays a blank screen, try SD with Tests. It uses a more common procedure of checking for errors at each step in the file system mounting and file opening steps, and will display messages about certain problems encountered while executing the program.
How it Works
The Circuit
See the metal stripes under the SD card? Those are the electrical connections, called pads, that a device uses to communicate with the memory chip inside the card.
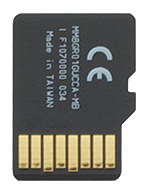
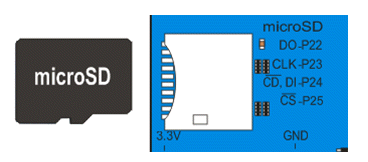
DO, CLK, DI, and CS are names for certain pads in the SD card. Those pads get connected to Propeller I/O pins when you plug an SD card into a Propeller Activity Board (original or WX version) socket. The Propeller chip will send control signals to CLK, CS, and data to DI. It will also receive data from DO.
The Code
First, four global variables are named and initialized for the microSD card pads, and the Propeller I/O pins they will be connected to through the board’s card socket: int DO = 22, CLK = 23, DI = 24, CS = 25;
These global variables are used by name in the function call sd_mount(DO, CLK, DI, CS). This gives the SD driver library the information it needs to open the SD card and get its file system information.
Once sd_mount opens the file system, you can then use functions from the stdio library (included by simpletools.h) to create and use files on the SD card. The first such function call is FILE* fp = fopen(“test.txt”, “w”).
The fopen function creates a file (if it doesn’t already exist) and returns a value called a file pointer, here named fp. fp will initially point to the start of the file. Later on, fp is used in operations for opening, writing to, reading from, and closing the file.
The fopen function takes two parameters. First is a character array with the file name “test.txt” in our example. Second is the mode, “w” in our example, which means the opened file can be written to. (Other options include “r” for read and “a” for append.)
Characters can be written to the file with the fwrite function. In our example, fwrite(“Testing 123…\n”, 1, 15, fp) copies the characters in the string to successive locations in the test.text file. The fwrite function takes a pointer to a buffer of data (our string “Testing…”), the size of each element of data in bytes (1), the number of data elements to write (15 bytes; characters), and a pointer to the file (fp) to write to.
When done, fclose(fp) closes the file.
Next, the program sets up a character array with char s[15]; as a buffer to store data read from the SD card file. Then, the file is opened for reading with fp = fopen(“test.txt”, “r”). Then, fread(s, 1, 15, fp) tells the file system to copy data to the s character array, in 1 byte chunks, a total of 15 bytes, starting at the fp file pointer. Since the file was just opened, fp points to the beginning of the file. When done, fclose(fp) closes the file again.
Finally, print(“%s”, s) displays the values that fread placed in the s character array. The %s format placeholder tells the print function to send the values in the character array as a string of ASCII characters to the SimpleIDE Terminal. One last print(“\n”) moves the cursor down one line in the terminal.
/*
  SD Minimal.side

  Create test.txt, write characters in, read back out, display.
*/

#include "simpletools.h"                      // Include simpletools header

int DO = 22, CLK = 23, DI = 24, CS = 25;      // SD card pins on Propeller BOE

int main(void)                                // main function
{
  sd_mount(DO, CLK, DI, CS);                  // Mount SD card

  FILE* fp = fopen("test.txt", "w");          // Open a file for writing
  fwrite("Testing 123...\n", 1, 15, fp);      // Add contents to the file
  fclose(fp);                                 // Close the file

  char s[15];                                 // Buffer for characters
  fp = fopen("test.txt", "r");                // Reopen file for reading
  fread(s, 1, 15, fp);                        // Read 15 characters
  fclose(fp);                                 // Close the file

  print("First 15 chars in test.txt:\n");     // Display heading
  print("%s", s);                             // Display characters
  print("\n");                                // With a newline at the end
}
Did You Know?
Look around the SD Card examples folder—there is an example that allows you to test if the SD card is responding before attempting to read or write data.
stdio library — The functions fread, fwrite, fopen, and fclose are part of the stdio.h library, which is included with the Propeller GCC compiler. Check here for a complete list of stdio file input/ouput functions: http://en.wikipedia.org/wiki/C_file_input/output.
fprintf and fscanf – There are some other functions available to edit files, in much the same way as fwrite and fread, called fprintf and fscanf. These functions, however, use far more memory than fwrite and fread, so they are not used here. Feel free to investigate for yourself!
Try This
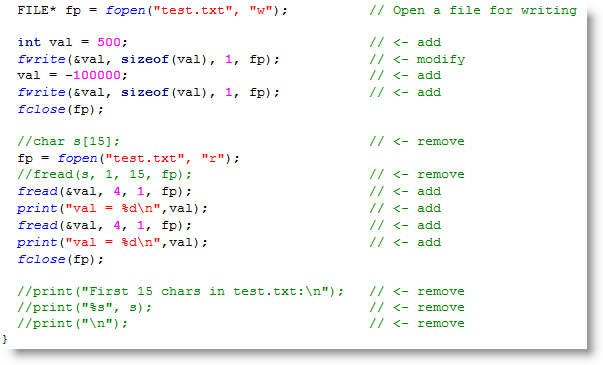
Just as you can use print(“%d\n”, val) to display a value, so you also can use fwrite(&val, sizeof(val), 1, fp) to store a value on the SD card. Then, it is possible to retrieve the value with the function fread. Let’s try it.
- Use the Save Project As button to save a copy of your project in …Documents\SimpleIDE\My Projects.
- Modify the program as shown here.
- Run the program and verify the output.
Your Turn
- Try recording and playing back twenty sensor measurements. The measurements can be taken every half second for ten seconds.
Good sensor choices include:
This type of project is called sensor datalogging, and has numerous applications in industry and the sciences.
